

User guide5 min
Add a site
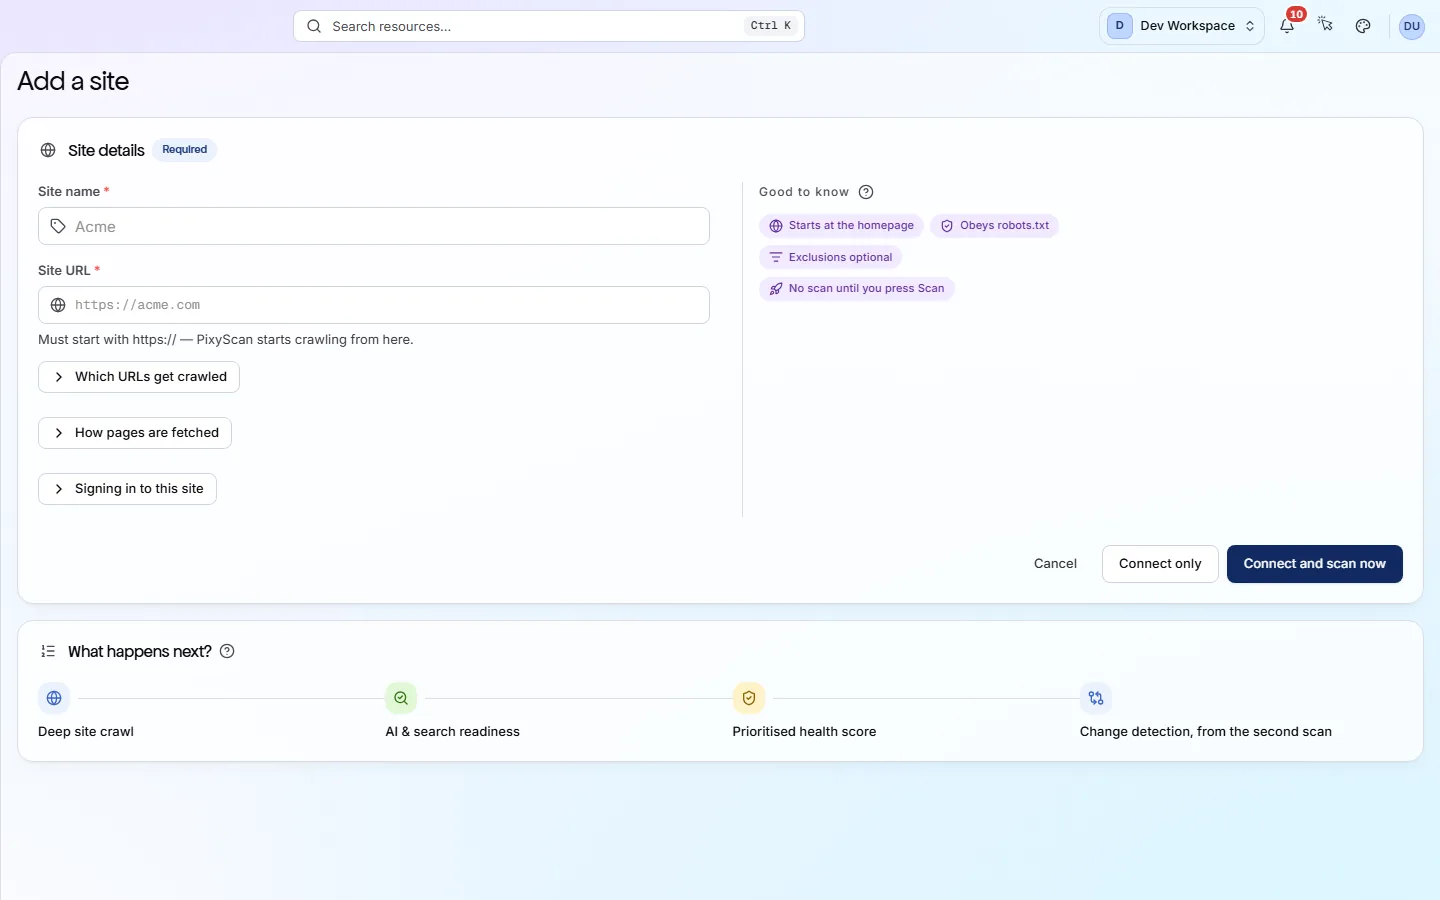
A site is one website you want PixyScan to check. To add one, give it a name, paste its URL and press Connect and scan now. The three optional sections below are for sites that need special handling. Most sites can leave them closed.
The two required fields#
PixyScan needs a name that you will recognise and a URL where the crawler should start.
- 1
Press Add a site
It is at the top of the workspace sidebar, and in the header of the workspace overview.
Seeing an upgrade message instead of the form? You have used all the sites your tier allows: 1 on Free, 2 on Hobby, 5 on Basic and 25 on Pro. Upgrade to add more.
- 2
Fill in Site name
This name is only a label for you and your team, so use whatever you will recognise in a list, such as a brand, a client or an environment like “Acme staging”. You can change it later.
- 3
Fill in Site URL
The address must start with https://. The crawl begins at this address, so use the one your visitors actually land on, including www. if that is the version your site uses.
- 4
Press Connect and scan now
PixyScan creates the site and starts its first scan straight away. If you want to set crawl rules before anything is fetched, press Connect only instead; that creates the site without scanning it, and you can start the scan later.
app.pixyscan.com/w/…/s/new
Which URLs get crawled#
This section controls where the crawler may go, how deep it goes and how many pages it may fetch.
Do I need this? Only if part of your site should be left out, like an admin area. Or if your site makes endless URLs, like product filters, a calendar or search results. Otherwise the defaults crawl every page the crawler can reach.
You can change these later on the Crawl tab of the site's Settings.
| Field | Default | What it does |
|---|---|---|
| Include URLs or patterns | — | Leave this empty to crawl every reachable URL. If you add a pattern, only matching URLs are crawled, and a full URL you add is also crawled directly. |
| Exclude patterns | — | URLs that match an exclude pattern are skipped. If a URL matches both an include and an exclude pattern, the exclude pattern wins. |
| When a URL matches | — | You must choose one once you add an exclude pattern. Pre skips a matching URL before it is fetched, so pages reachable only through it are never found. Post fetches the page so the crawler can follow its links, but leaves the page's own data out. |
| Max depth | Unlimited | How many links deep the crawler may follow from the start URL, up to 50. Sitemap URLs are only crawled when this is left blank. |
| Page budget | Your tier's limit | The most pages one scan may fetch. Leave it blank to crawl as many as your tier allows (500 per scan on Free, up to 15,000 on Pro). |
| Also crawl from sitemap.xml | On | The crawler also reads your XML sitemap, so it finds pages that are listed there even if no other page links to them. |
| Respect robots.txt | On | The crawler obeys your robots.txt rules and nofollow instructions, as a search engine would. Turn it off only for a staging site that blocks everything on purpose. |
Each crawled URL uses one URL credit
How pages are fetched#
This section sets how the crawler reads each page, what name it gives your server and how fast it goes.
| Field | Default | What it does |
|---|---|---|
| JS rendering | Server HTML | Server HTML reads the page your server sends, which is fast and right for most sites. Rendered JavaScript loads each page in a real browser and runs its scripts first. It is included from Pro up and takes roughly 7.6 times as long. |
| User agent | Default (pixyscan-bot) | The name the crawler gives your server. You can also choose Desktop Chrome, Mobile Chrome, Googlebot (smartphone) or a Custom string, for example if your firewall only lets certain visitors through. |
| Rate limit healing | Off | When on, the crawler fetches pages one at a time and waits a set delay between them (from 0.1 to 10 seconds). Turn it on if your server blocks or slows down during scans; the form shows how much longer the scan will take. |
Start with Server HTML
Signing in to this site#
Use this section for a staging or preview site that is protected by HTTP Basic Auth.
HTTP Basic Auth is the simple browser pop-up that asks for a username and password. Turn it on and enter the Username and Password. PixyScan sends them with every request and stores them encrypted.
Can it sign in through a login form? No. Basic Auth is the only sign-in the crawler supports.
Need a custom request header instead, such as an API key? Add it after the site is created, on the Crawl tab of the site's Settings.
What happens after you connect#
The form lists four stages under What happens next?, and the fourth starts with your second scan.
| Field | Stage | What it does |
|---|---|---|
| Deep site crawl | 1 | The crawler discovers your pages and the files they use, and records the status code each one returns. |
| AI & search readiness | 2 | Every page is checked for how well search crawlers and AI answer engines can read and quote it. |
| Prioritised health score | 3 | Findings are sorted into Critical, Important and Standard issues, and the site gets a health score out of 100. |
| Change detection, from the second scan | 4 | Each later scan is compared with the previous one, so you see what a release changed instead of rereading the whole list. |
The next page, Run a scan, explains what happens while a scan runs and where to find the results.
Does something here not match what you see in the app? Tell us